OSRS Zulrah Guide
Who is This Snake ?
Zulrah is a level 725, solo boss that can be found in Zul-Andra. It is one of the first bosses to be added into the game and it’s still being farmed to this day because of how easy it is to kill and its consistent money drops.
Death Mechanics
Zulrah is one of the easiest bosses in the game hence you won’t be dying after learning the mechanics. However in the case of you dying all your items will be held by the priestess on the docks. You can reclaim your items for free if your kill count is under 50, if it’s over 50 you have to pay 100k to get your items back. Also after you die you should immediately get your items back since if you die again before reclaiming your OSRS Gold, they will be lost.
Requirements
First of all, to access the boss you will need to complete the quest “Regicide”. After completing the quest head over to Zul-Andra and speak with the High Priestess Zul-Harcinqa to offer yourself as a sacrifice in the place of the gnome child. This will allow you to start the boss fight by boarding the ship. If you want to have easier and faster kills another quest to complete is “A Kingdom Divided”. This quest unlocks the spell “Resurrect Greater Ghost” which will summon a ghost to fight by your side for 60 seconds.
- Recommended Stats
As with any PVMing in this game the higher your stats the better, however you can kill Zulrah with relatively low stats.
- 75+ Ranged
- 76+ Magic
- 42+ Defence - 70 recommended for high level prayers
- 45+ Prayer - 77 recommended for Augury and Rigour
- 80+ Hitpoints
Aside from the combat stats, depending on how you are going to go about your trips, there are some useful stats to have:
- 83 Construction - This is to build a rejuvenation pool and a fairy ring to your house. Rejuvenation pool is the best way to restore your stats after each fight and the fairy ring is the cheapest way to get to Zul-Andra.
- 71 - 76 Agility: This is required if you are going to use the fairy ring to get to the boss. You can have 71 agility and eat a summer pie to be able to use the shortcut.
Gear
To kill Zulrah you will need to use both magic and ranged, however if you have the best in slot equipment for either magic and ranged you don’t need to use the other one. ( E.i: If you have best in slot ranged, you don’t need to bring magic )
Ranged Only Setup ( Best in Slot )
- Masori mask (f)
- Necklace of Anguish
- Ava’s assembler
- Masori body (f)
- Masori body (f)
- Twisted bow + Toxic blowpipe (optional)
- Dragon arrows
- Zaryte vambraces
- Pegasian boots
- Ring of suffering (ri)
Mage Only Setup ( Best in Slot )
- Ancestral hat
- Occult necklace
- Imbued god cape
- Ancestral robe top
- Ancestral robe bottom
- Tumeken’s shadow
- Off-hand is empty
- Rada’s Blessing 4
- Tormented bracelet
- Eternal Boots
- Ring of suffering (ri)
Alternatively you can bring Harmonised nightmare staff with a tome of fire and cast fire surges.
Mage / Ranged Setups
You can bring the best gears for each style but it’s not recommended as it will be too much switching so it’s better to pick a style and always wear it’s armour and do a four way switch for amulet, boots, Swap RS3 Gold and weapon. ( feel free to switch the entire armour set if you are good at switching )
Another item to take note of here is the serpentine helmet, if you want to you can wear it to save an inventory spot as it makes you immune to venom.
- Setup 1
- Ahrim’s hood or Serpentine helmet
- Occult necklace & Necklace of anguish
- Imbued god cape & Ava’s assembler/accumulator
- Ahrim robe top
- Ahrim robeskirt
- Sanguinesti staff/Trident of the swamp & Toxic blowpipe
- Elidnis’ ward/Malediction ward
- Any blessing
- Barrows gloves
- Eternal boots & God d’hide boots
- Ring of suffering (ri)
- Void Setup
Both the regular void and the elite void are fine.
- Void mage helm & Void ranger helm
- Occult necklace & Necklace of anguish
- Imbued god cape & Ava’s assembler/accumulator
- Void knight top
- Void knight robe
- Sanguinesti staff/Trident of the swamp/Trident of the seas & Toxic blowpipe
- Elidnis’ ward/Malediction ward/Book of darkness
- Any blessing
- Void knight gloves
- Eternal boots & God d’hide boots or Boots of brimstone
- Ring of suffering (ri)
- Budget Setup
In this setup we will be switching our top and bottom.
- Farseer Helmet & Karil’s coif
- Occult necklace
- God cape / Ava’s accumulator
- Mystic robe top & Black d’hide body
- Mystic robe bottom & Black d’hide chaps
- Trident of the seas/Iban’s staff & Magic shortbow (i)
- Book of darkness
- Amethyst arrows
- Combat bracelet
- Mystic boots
- Ring of recoil
Inventory Setup
Aside from the switches you choose to bring, the rest of your inventory should look like this:
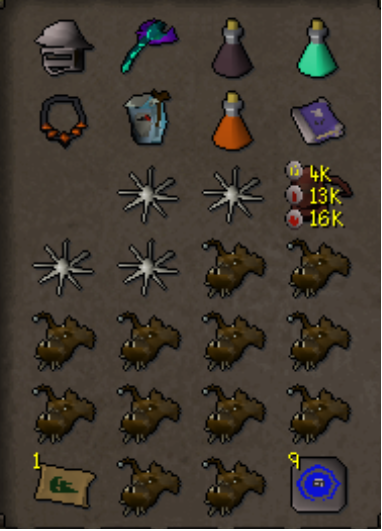
- 1 Prayer potion
- 1 Anti-Venom+ ( not needed if using serpentine helmet )
- 1 Bastion Potion
- Imbued heart ( not necessary if you don’t have the money )
- Rune pouch ( for fire surge or resurrect greater ghost )
- Book of the dead ( for “resurrect greater ghost” )
- 1 Zul-andra teleport ( if you are using this to get to the boss )
- House tabs
- 1 empty spot for switching your off-hand
- 4 Karambwans
- Rest is Anglerfish or sharks
Killing Zulrah
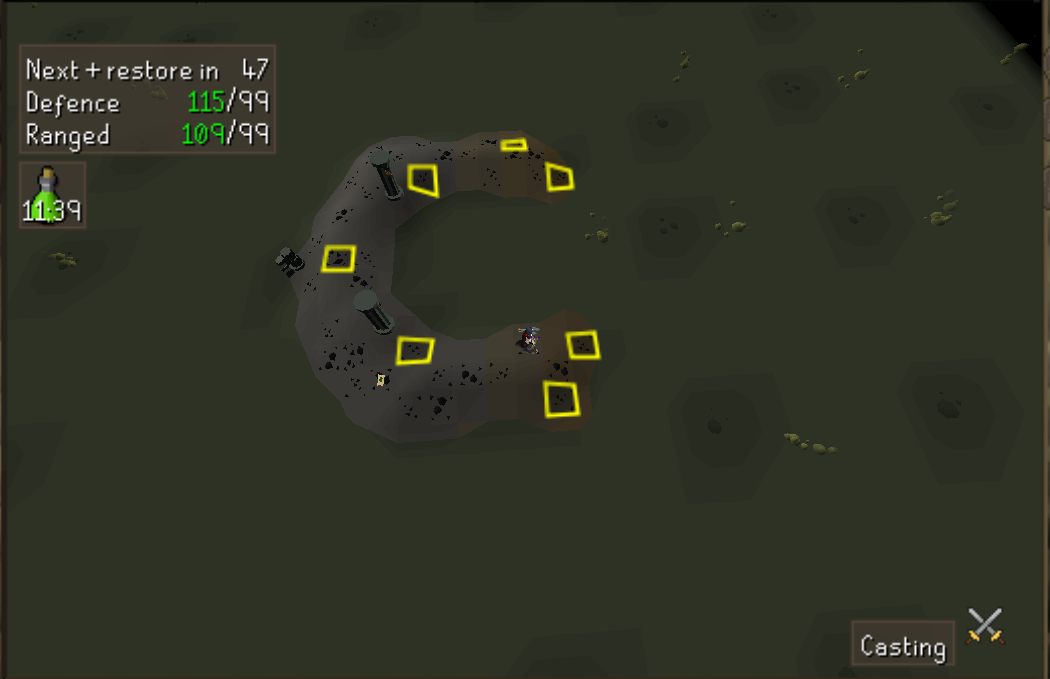
Zulrah has 3 forms and 5 different types of attack. To deal with Zulrah effectively we are going to be using these tiles, you can mark them in your game as well.
Forms & Attacks
- Green form - weak to magic - attacks with ranged
- Blue Form - weak to ranged - attacks with both magic and ranged
- Red Form - weak to magic - attacks with melee
Ranged and magic attacks are pretty simple; you just have to pray against them. Melee attacks don’t happen instantly and you can’t use protect melee against them. To avoid the melee attack you can either stand on a blind spot, which the attack will always miss or you can wait for the charge up animation and change tiles. For example:
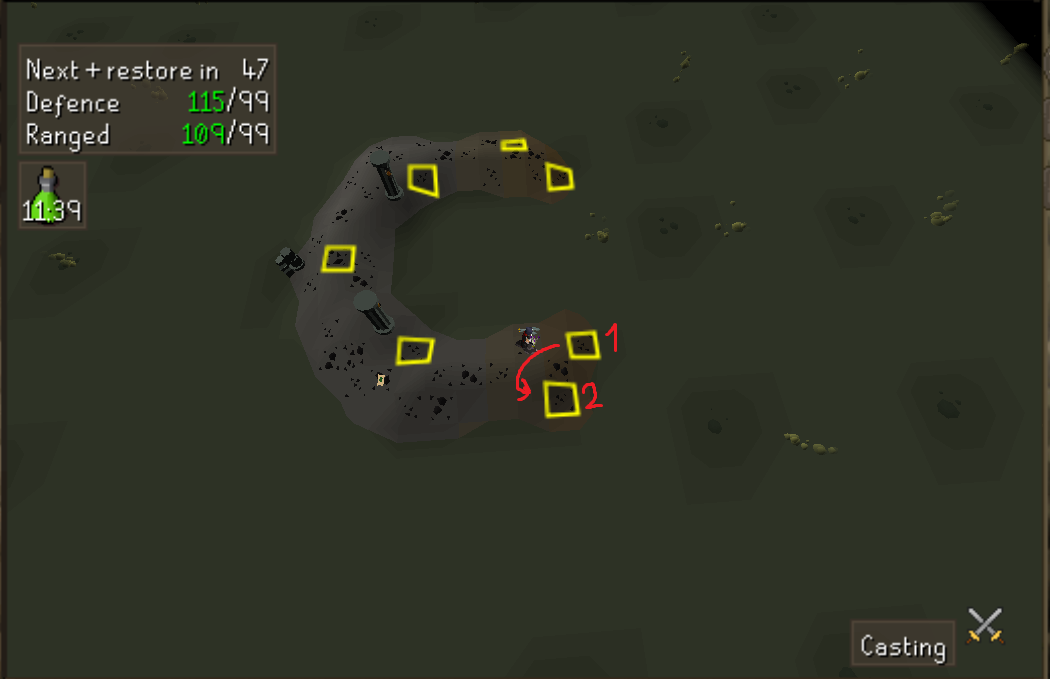
When the attack starts winding up you will be in tile 1, attack once and immediately move over to tile 2. After the first attack Zulrah will charge up its next attack again, attack twice and move to tile 1 and keep attacking. Zulrah will always attack twice on a melee form. ( It works the same way on the opposite side of the map )
Snakelings
Occasionally Zurlah will start spawning snakelings to attack you. These snakelings have only 1 health so the best way to deal with them is with a ring of recoil or ring of suffering charged with rings of recoil. The max hit of snakelings are 15 so be wary of your health when they spawn, as multiple of them can hit you all at once, alongside Zulrah.
Venom Cloud
During the fight Zulrah will often spit out venom clouds that will cover the arena. Standing within a 2x2 radius of these clouds will damage you every tick. To avoid this you must always stand in areas that do not have venom clouds. If you don’t do this, the fight will become impossible.
The Fight
Before you enter the boss fight make sure that you have your mage gear on, also you can eat an anglerfish to boost your max health. When you enter the boss fight immediately summon a greater thrall if you have the requirements and run to the easternmost tile. Put on augury or mystic might, drink your anti-venom+ and baston potion and start attacking Zulrah.

The key part is the rotations. Zulrah has 4 different rotations that it will do. At the beginning of each fight the game will pick a random rotation. To do the fight correctly you will need to either memorise each rotation, have a picture of it open or download the “Zulrah Helper” plugin to see the rotation pictures in your client. Here are the rotations:

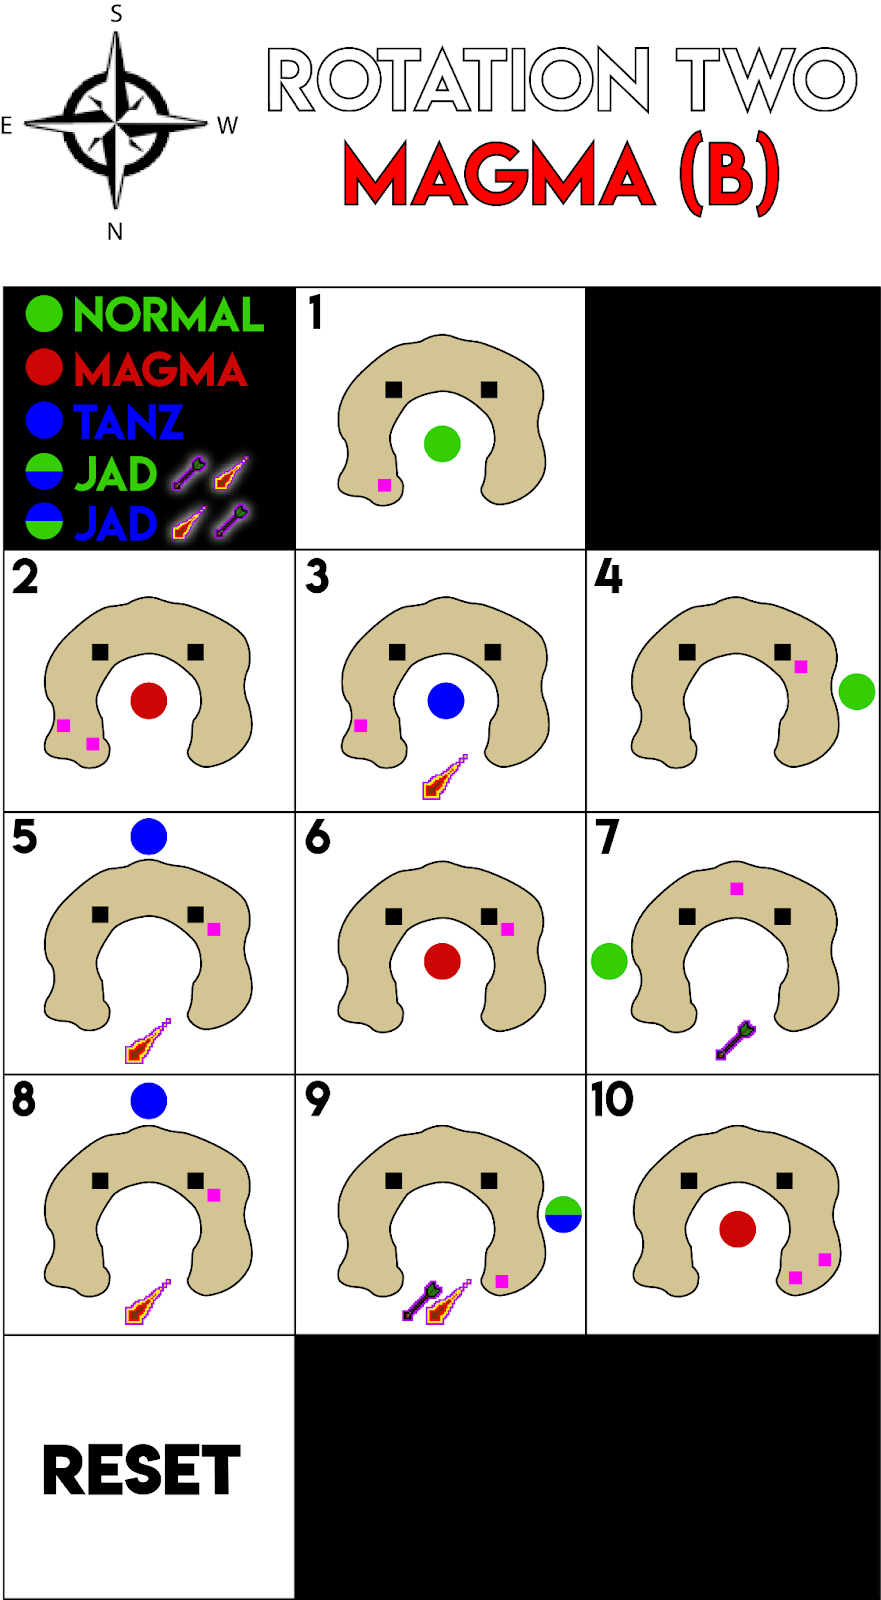
The spots that are marked with pink are the tiles that you should be standing on for each phase. First phase of each fight is the same so after the Zulrah submerges and re-emerges, you can figure out which rotation you are on and follow accordingly. Magma A and Magma B share the first 3 phases so you will need to wait until phase 4 to figure out which rotation you are on. When Zulrah submerges you should run to the next marked spot on your rotation and always make sure to switch your prayers first before changing your gear.
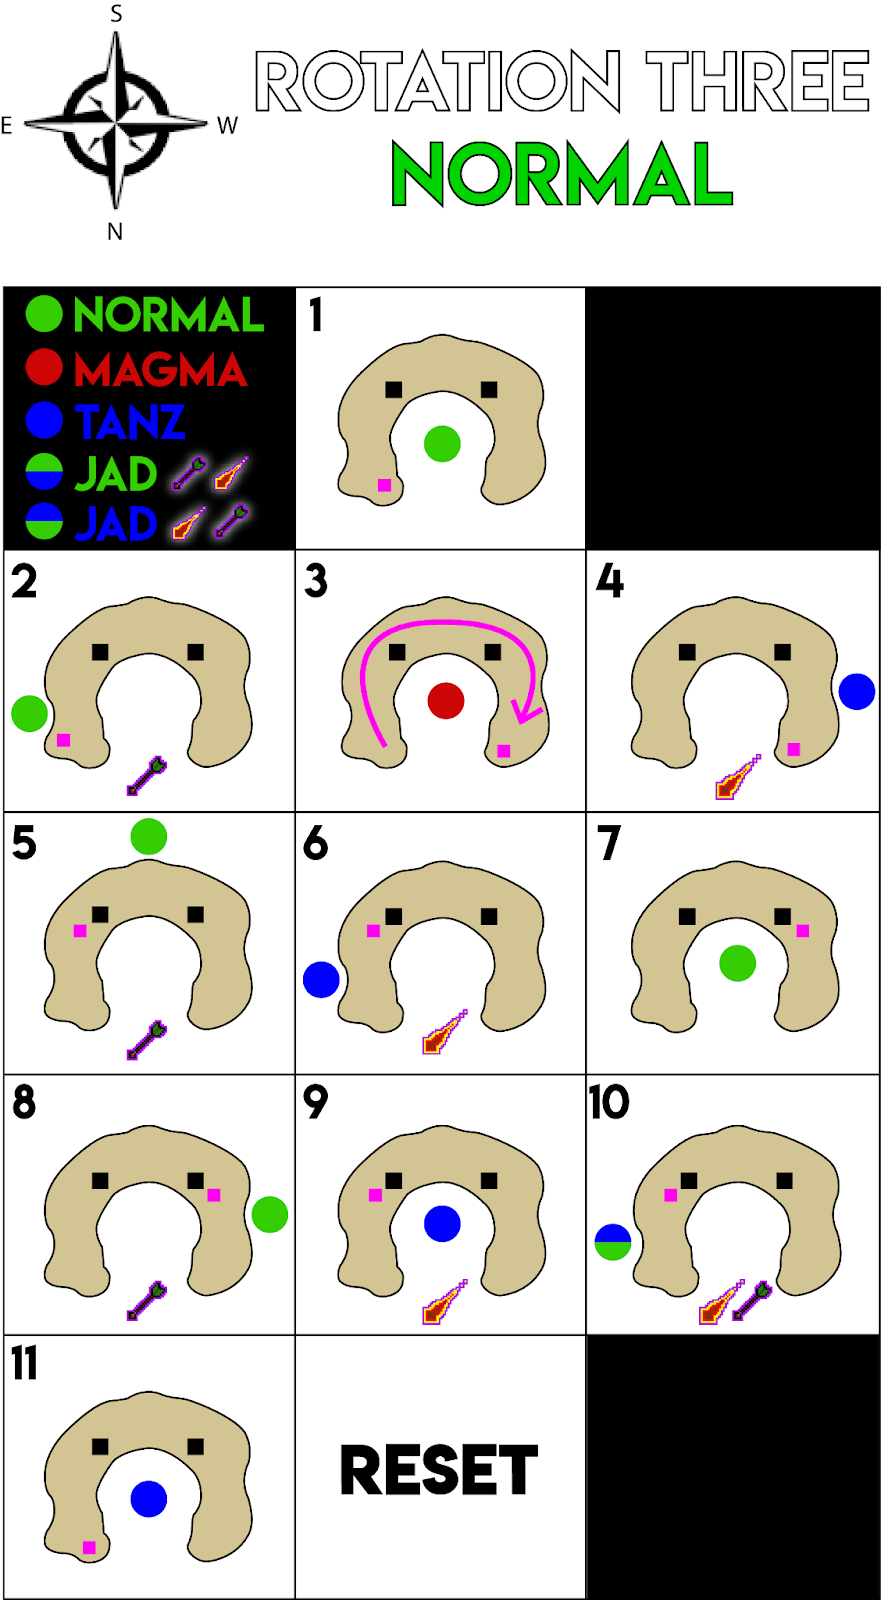
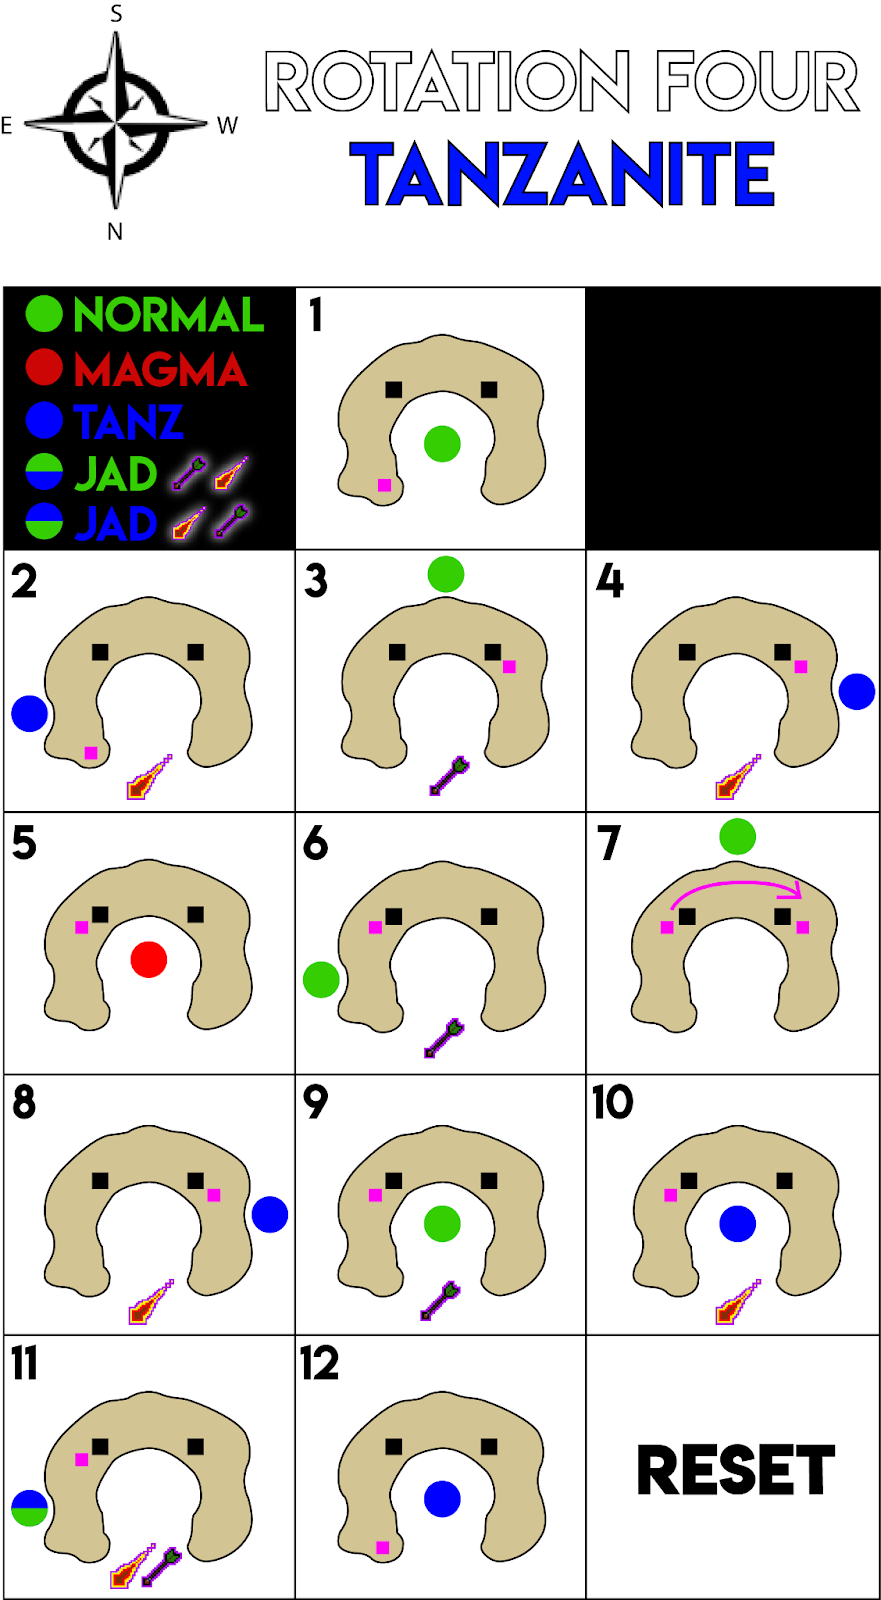
The pictures that have the two pink spots marked with an arrow in between them basically tells you to start the phase in the first mark and run to the other marked spot during the phase rather than at the end of the previous phase.
At the end of each rotation there is a “jad” phase where Zulrah will change it’s attack style after each hit, so you must change your prayer after each attack Zulrah does. In the pictures the “jad” phase is symbolised as a half green half blue orb and the prayer symbols show the attack pattern. For example for rotation one, Zulrah starts with a ranged attack followed by a magic attack.
After each rotation is over Zulrah will reset and another random rotation will start. You shouldn’t see this often as most of the time you will be killing Zulrah in the middle of its first rotation.
Don’t forget the fact that Zulrah will attack with both ranged and magic during it’s blue phase so keep track of your health. Also if you can help it, always eat food in between phases when Zulrah submerges in the water to not waste ticks.
Tired of Grinding? old school runescape buy gold and Rock the game!
Article From: OSRS Zulrah Guide
Latest comments
No comments

About ✔ Terms ✔Privacy
Say and get NFT
© 2017-2022
«0xbt»
A world without censorship
0xbt[cat]0xbt.net